TPMS: Protect RV Tires with Tire Pressure Monitoring Systems
Have you ever checked the price of new tires for an RV?
Then you know that RV tires can get quite expensive! Especially if you are looking for tires for a larger Class A or Class C motorhomes. Many of the larger motorhomes have 6 or even 8 tires, making it downright mind boggling! (Perhaps I’m in the wrong industry and need to start making tires, geez!)
So we need to do what we can to protect our RV tires, so we don’t have to buy them before their useful lifespan is up. Find out why one of the best investments for your RV is a Tire Pressure Monitoring System (TPMS) and other tips for caring for your RV tires.

What Happens When RV Tires Go Bad
When your RV tires go bad, they are likely to lead to what is called a blowout. A tire blow-out is a sudden catastrophic failure of your tires.
For many RVers, experiencing a tire blowout is not simply a flat tire. More often than not, parts of the tire will separate and cause damage at or behind the damaged tire. This could cause issues to the body of the RV, any of the undercarriage pipes, drive shaft, water tanks, or other vital RV systems.
You may lose control of your RV, which can cause you to flip over or run into oncoming traffic or other obstacles. In the most extreme cases, a blowout could lead to death for you, others in your RV or others on the road.
Now, not all blowouts can be prevented, but many can. And those preventable RV tire blowouts are the ones we are going to focus on today, to make you and the road a little safer, save you money, and get you to your destination.
Read on to find out why I think TST Tire Pressure Monitoring System is my recommended TPMS for motorhomes!
How Long Do RV Tires Last?
In passenger cars, you’ll generally check the tread to figure out when you need new tires. The tires basically wear down to the point you don’t have good traction and control. But that is rarely the case with RV tires.
Most people do not drive their RVs enough for wear to be the cause of death for RV tires. Instead, it is age. With age, your tires become weaker and more likely to cause blowout.
Most RV tires last between three and six years. That means if you can extend the life of your tires to the upper age limit, you can effectively save 50% off the cost of new tires.
How do we increase the lifespan of RV tires? Well, I’m glad you asked. Read on for some tips on extending the life of your tires.
Maintain Your Tires
Tires are made of rubber compounds as well as other materials. In passenger and light truck tires, about 19% of the tire is natural rubber and 24% is synthetic rubber. In larger truck and RV tires, it can be as much as 34% natural rubber and 11% synthetic.
This rubber is also the most likely part of the tire to fail, cause a blowout, or cause an early end to the lifespan of a tire.
Fortunately, there are some tricks to maintaining your RV tires to help protect the rubber and extend the lifespan.
RV Tire Dry Rot
Have you ever heard of tire dry rot? Or maybe you heard it called sidewall cracking.
In either case, it is most often recognized by small cracks in the tire rubber, either on the tread or the sidewall. You may also notice brittleness to your tires or faded color.
Dry rot allows air to escape from the tires through those small cracks. This is going to lead to under-inflation, one of the primary causes of tire blowouts in all vehicles, but especially RVs.
Dry rot may also cause the rubber to expand and then break apart the tire, with the tread separating from the rest of the tire.
You should inspect your tires at the beginning of camping season, end of the camping season and before trips for signs of dry rot. If you have only small signs of dry rot, you may be able to rehab the tires before they are considered irreparable.
Invest in Good Tires
RV tires are expensive. I get it.
But they are also one of those things that you get what you pay for.
Consider your RV tires an investment and buy quality, name brand tires. Don’t skimp out and buy used, repaired tires or what many refer to as “China Bombs” – tires made outside the United States in a very cheap manner and imported in.
High quality tires are less likely to develop premature dry rot and will last you much longer. Plus, if something does happen because of a manufacturing defect, you are much more likely to be able to get a US or name brand tire manufacturer to make it right. That won’t happen with those shady tire dealers from who knows where.
Limit the Water
Did you know that water actually has a drying effect on rubber?
Tire rubber contains certain oils that keep the tires in proper shape and prevent dry rot.
So you’ll want to limit washing your tires. And when you do, don’t use any harsh chemicals like bleach, chlorine, etc. Use specially formulated RV cleaners for the body of the RV (because drips) and then finish the wash with specially formulated tire cleaners.
This will keep the rubber in your RV tires soft and pliable. Which is a good thing. Because dry and brittle lead to dry rot which leads to blowouts which leads to all sorts of nasty things.
Tire Protectant and Sealer
The next way to keep those oils in the rubber is by actually adding them back, for what is lost through time, weather, your past mistakes.
My favorite and recommended tire protectant is the 303 Tire Coating & Protectant.
This spray on protectant will foam up, getting into all those microscopic cracks and sealing them up. It will prevent damage from UV rays and prevent fading. It also gives you that glossy satin finish for your tires. Because why would you want the rest of the RV to look great but the shoes to be ugly?
Sun UV Covers
The next way to protect from the damaging UV rays of the sun and other general weather conditions is by covering your RV tires when you are parked. Now, most people aren’t going to do this for a quick RV overnight stop.
But you should strongly consider adding RV tire covers to your setup anytime you are parked outside, whether in offseason storage, between trips, or during long-term stays at RV campgrounds.
There are generally two types of tire covers that most people use:
On-tire Covers – make sure that you get the covers that fit the size of your tires.
Snap-on Tire Covers – several accessory manufacturers, like Magnashade, use UV material that snaps onto the RV.
Drive Your RV to Maintain the Tires
Finally, one of the best tips is to drive your RV around. Don’t let it sit in the driveway or in storage! Or even in an RV campground.
As part of your monthly maintenance, while you check the water in the RV batteries and run the generator, you should also take your RV out for a spin.
This will help not only keep the tires properly distribute oils, it’ll help oil and lubricate much of the motorhome engine.
Proper Inflation
When you are taking your RV out for a spin, whether around the neighborhood on a maintenance run or around the country in an epic road trip, you’ll want to make sure that your tires are properly inflated.
With proper inflation, you are going to have a much smoother ride that you will if the tires are over or under-inflated. You are also much less likely to have a blowout, at least one of those preventable blowouts.
Without proper inflation, on the other hand, the tire will collapse in on itself. The inner parts of the tire will bend, causing the tire to not perform correctly and then eventually just fail.
How to Determine the Proper Tire Pressure
What’s the proper tire inflation? That depends.
First, you’ll want to check your RV tires. In the fine print on the sidewall, you can find the maximum psi for that tire. You don’t ever want to exceed this number when you are starting cold. This is your maximum upper bound, but if you run at this, you’ll probably have a pretty hard ride.
Second, you can check your RV manufacturer’s recommendations. This is likely on a chassis plate, either near the driver’s cab or on the inside of the door to your RV. The RV manufacturers set this based on the weight that your RV is and what it can carry. They set these numbers based on the maximum weight carrying capacity.
Third and the most accurate is to get your RV weighed. Get your RV weighed as you would normally drive with it – how many people and pets, how much water and fuel, and how much other “stuff” you carry.
Then take it to a weigh station. Most truck stops have CAT Scales that you can use for a small fee. Preferably, the scale would weigh each wheel separately, but many are only by axle. So we make a little bit of a leap and assume that the weight is evenly distributed from one side to the other (passenger to driver side). To the extent possible, you’ll want to do this anyways, for a smoother and easier ride.
Finally, check with your tire manufacturer. Look up your particular brand and model tire and see what the tire manufacturer says for your weight. Remember, if you measured by axle, you’ll need to divide by two. Remember to read the proper row for single or dual wheels to get the proper tire pressure.
Often, you’ll get slightly different numbers for the front vs the back axles. Set the tire pressure accordingly and air up the tires.
You are likely to not have the precise optimum pressure, because your weight loads will change. If you are going to err on one side or the other, err on the higher pressure. Being slightly over-inflated is much better for your tires than being under-inflated.
Tire Pressure Monitoring Systems – TPMS for RVs
The best way to continuously monitor tire pressure and even temperature while you are driving is by using a Tire Pressure Monitoring System, or TPMS.
TPMS have been standard in passenger cars, trucks and SUVs since 2007, but they are not standard in RVs. Many higher end diesel motorhomes come with a built-in TPMS, but most of the low to mid-tier diesel and almost all gas models do not have an integrated TPMS. Trailers and fifth wheels also do not have TPMS.
That likely means you will need an after-market TPMS system for your RV. The good news is that the systems are typically easy to install and manage. The bad news is that you are now going to have another gadget sitting on your RV dashboard.
Most quality RV TPMS systems will monitor each individual tire’s pressure and temperature. You can then set low and high alerts for pressure and high alerts for temperatures, so you’ll be warned as you get to the limits of your tires.
These alerts are great for telling you when the tire is heating up – hot pavement or other issues and you need to stop and chill for awhile. Or when you are losing air and risk a blowout due to under-inflation.
TPMS for Trailers and Smaller Motorhomes
For many RVs, including smaller Class As and Class Cs, the Tymate TPMS is the way to go. This is the system I personally used on Starter RV, a 1990 Winnebago Chieftan which was my first RV.
The Tymate TPMS has low and high pressure alerts and high temperature alerts, as well as high alerts for temperature. It also has alerts for low sensor battery and a rapid air leakage (sudden blowout). The rapid leakage alarm is important because in a sudden blowout, every second is going to matter as you struggle to regain control of your RV.
I also love that it has solar lithium battery panels to run the system. This means during your daylight driving hours, you don’t need to use up a lighter charging station. But, if you need it because you are driving during the night or during cloudy conditions, you can supplement with the USB charger.
The major limitation on the Tymate system is that it only goes up to 87 psi. So if your max pressure for your RV tires is above this, check out the recommendation below for larger motorhomes, where the TST TPMS is a better option.
Another limitation is the number of sensors – either 4 or 6. That’s not going to work with the larger motorhomes, especially if you also have a toad or trailer that you are pulling behind you.
TPMS for Large Motorhomes
The bad news about the Tymate system is that they are only designed for psi up to 87. They typically limit out on their display at 99 psi.
But larger motorhomes have a much higher psi, even sitting cold. Definitely by the time you get up to speed and temperature, but before you hit your max.
So if you use a Tymate system on a large motorhome, you are going to miss out on the high limit alerts. Which are definitely a must-have if you are traveling in the hot summer months.
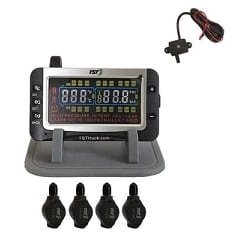
My recommendation for larger Class A and Class C motorhomes is the TST TPMS with flow-thru sensors. This is the TPMS that I use on my Class A Tiffin 34PA.
All told, the TST TPMS can monitor up to 115 wheels! That means you can add sensors to your RV, your toad, the extra trailer, etc etc etc and still have some left over! But that means the system is very flexible, no matter what your setup is!
The system has two types of sensors – a flow thru sensor (my preference) and a cap sensor. The cool thing about the flow-thru sensor is that you do not have to remove the sensor when adding air to the tire. Unfortunately, the flow-thru sensors only work with metal stems or metal valves. So if you have rubber valves, get the cap sensors.
The TST TPMS systems are easy to program. When you first get the system, you’ll need to program the sensors to correspond to where you will place each one (front drivers, back driver outside, back driver inside and same for the passenger side). Programming the sensors is not a difficult process – you scroll through the menus and select the position on the picture where you want it, hold the sensor close and press program. Hold a few seconds until it beeps and then move to the next one. Repeat until you complete all of them.
For installation, it is real easy as well. You unscrew the cap on the tire valve, place the correct sensor for what you have just programmed in the right place and move to the next one. You can also use an anti-theft washer to prevent removal of the sensors without a proper tool.
For longer setups, with trailers or toads, there is a signal repeater that you can install near the back of the RV to allow for the signal to make it all the way to the front wear you’ll keep the monitor.
Once you have the initial setup done, it is mostly a set it and forget it system. Until you have alerts! Then you know whether you need to stop and chill or add more air.
TPMS Systems Save RV Tires

Do you have a TPMS on your RV yet? If not, you’ll want to get one ASAP!
Because a TPMS is an important part of protecting your RV and keeping everyone safe.
Like these RV tire tips? Pin for later!
See Also:
Must Have RV Safety Gear
8 Annoying Things That Are Actually RV Safety Features
Tips to Prepare Your RV For Tailgate Season


